Showing posts with label contributor post. Show all posts

Monday, November 24, 2014

Mani Monday with Tiffany

Hey Glitter and Gloss fans!  I have been super busy as of late and therefore lacking the time to come up with and show you a new design.  So what I figured I'd do is flashback to Thanksgiving 2 years ago!  This is what I had on my nails on Thanksgiving in 2012 and the blog post I wrote about it then.  This was only my 2nd post ever...hope ya'll like it!

I'm back with my second post!  See, I have a huge "back log" of photos, because I've been taking pictures of my nails for a while now.  This is what I wore for Thanksgiving!


I got this idea from a manicure Cristina at Let Them Have Polish did for Thanksgiving last year.  Here's hers.  LTHP was the first blog I decided I needed to see all the time.  It's still my favorite, check her out!  

For this one I used a base of a-England Lancelot.  It's not black, I promise.  BUT, it might as well be.  The only time it's at all evident that it isn't black, is next to a true jet black, like a-England Camelot.  Here is Lancelot, two coats, no top coat.  The formula is fantastic. 


When that was pretty dry, I sponged OPI Warm & Fozzie on the tips (with a round makeup sponge I cut into a little rectangle shape).  Now, W&F looks horrible on my nails by itself, but I really, really loved it this way - the pink and copper glitter shows up better. 


I almost left it alone, in fact I wore it like this for a day before I added a stamp using Bundle Monster image plate #309 (BM309).  My stamping color is China Glaze DelightDelight is from the Romantique collection and I have two other polishes from that collection:  Passion and Harmony.  They're great for stamping!  I got two of them from Trans Design, Inc. - it's cheap! a lot less expensive (even with shipping) than your regular retail store.


There you have it, my Fall/Thanksgiving mani!  Hopefully still fly 2 years later... 


Monday, October 27, 2014

Mani Monday with Tiffany


Hey once again ya'll!  As you are all well aware, it's October and it's also Breast Cancer Awareness month.  As such, for the past few years, I wear pink nail polish for the entire month of October - until Halloween!  Be sure to check those boobies on the regular! That would be once a month at least! Anyway, here are some of my pink nails from this month so far.

This one is my most recent.  I used my chevron nail vinyls for my thumb, index and pinky finger.  The pink is China Glaze Love's a Beach, the navy is Sally Hansen Complete Salon Manicure Navy Baby and the glitter on my middle finger is OPI Servin'  Up Sparkle.  My rhinestone pink ribbon did not turn out as well as I had hoped because the studs are so large - but you can tell what it is (I hope) nonetheless.


These next nails are plain and simple but still super pretty.  I got lots of compliments on these!  This is OPI Mod About You.  Makes my nails look kind of fake doesn't it?  These nails are super long (for me) and driving me crazy - as soon as the wedding I'm in is over this weekend, I AM CLIPPING THEM PRONTO!


Finally, this is my half moon mani.  Which I clearly need practice at.  I have a hard time getting the hole reinforcement stickers on there evenly across the nail, and the stickers are so thick it's hard to paint over them.  So don't look too close.  Here I used China Glaze Fuchsia Fanatic and OPI Skull & Glossbones (one of my all time favorite names of a polish.)


Are ya'll wearing any pink this month?  Which one of these is your favorite?  See ya next month. :)


Wednesday, August 13, 2014

hello sunshine! // free printable & iPhone images

Happy day, friends! First off, thank you for all of your sweet comments and emails about yesterday's post. I appreciate all of your support, truly I do! Today I have some pretty, freebie images for you guys, courtesy of my friend Sarah, and I think they're coming at a great time! Sarah is an amazing blogger, and graphic artist, so make sure to check out and follow her blog if you don't already!


For iPhone:


      ***Note** Remember that with the iPhone5, your wallpaper will get distorted if you don't have "reduce                                                                      motion" turned on.


To turn "reduce motion" on:
Settings --- General --- Accessibility --- Scroll down and click "Reduce Motion"--- turn that ON

For your desktop:

To print: 

PS - Happy, happy, happy birthday to my mom!!

Monday, July 21, 2014

Mani Monday with Tiffany!

Hi Glitter and Gloss readers!  Hope you guys are having an awesome summer so far.  I can't believe there's only about a month left... depressing.  I love summer.  Anyway, on to the nails...

I just ordered some Nail Vinyls in chevrons and straights from HERE, so of course I had to find a way to use them.  (Side note: love the nail vinyls.  They gave me very clean lines and I love that they're precut... oh my goodness cutting tape is for the birds.)  Please excuse the fact that they look just like Easter eggs.

For my base colors I used China Glaze Tardy for the Party (index and ring) and Zoya Shelby (middle and pinky).  I applied 2 coats of each.  Then I applied a coat of Seche Vite to my middle and ring finger (and thumb).

While I was waiting for my middle and ring finger to dry, I used a dotting tool to add dots to my index and pinky fingers.  For dotting I used Shelby and Sally Hansen Mint Sorbet on my index finger and Tardy for the Party and Mint Sorbet on my pinky finger, and topped those with Seche Vite.

Once my thumb, middle and ring fingers base coat was dry (takes about 10 minutes with the SV), I put 2 strips of chevron nail vinyls on each chevron nail.  Then, one at a time, I applied a coat of Mint Sorbet and removed the nail vinyl while the polish was still wet.  This is very important, if you let the polish dry at all then it will just pull polish off with the tape.  Not a good look.  I use tweezers to pull off the vinyls.  


Here's a picture with flash:


Hope you guys enjoyed!  Try it yourself, if you choose different colors it won't look so Easter eggy ;)  


These are DARLING, Tiffany, thank you for sharing!! Now it's YOUR turn to link up! As always, I will pin some favorites. Have a great week!

Monday, May 26, 2014

Mani Monday - flowers and glitter polka dots

Hey ya'll - so, I was supposed to be the Mani-Monday feature LAST Monday, but, I am a procrastinator.  And a slacker.  And it caught up with me.  Heather graciously allowed me to postpone until this week!  Thanks girl!  Hope it was worth the wait.  There is no particular theme for this design, like most of my others have been, but it is definitely spring appropriate.


This is my base color, Zoya Stephanie.  I used two coats.  I love this color, it's very clean and neat and just pretty.  Appropriate for anywhere.  


I used OPI Love. Angel. Music. Baby. for the gold dots.  I have yet to use this polish for a full mani.  It's from OPI's Gwen Stefani collection (love her!) and it's a gorgeous gold.  I don't have a lot of golds, but I do have a few and this is my favorite. There is a lot of depth and sparkle to it.

LEFT: With Flash  RIGHT: No flash, under desk lamp

I used Zoya Shelby and a large dotting tool to make the rose 'blobs'.  (See square 1.)  These, obviously, do not have to be perfect.  Roses are not perfectly circular and therefore neither do your blobs need to be!  (Exactly the kind of nail art I like.)  I used a tiny dotting tool and Color Club Miss Bliss to make the 'petals' of the roses.  I just draw random arcs and c-shapes around the flowers to look like petals.  (See square 2.)  There are plenty of great tutorials on YouTube for these types of roses, search for "vintage roses".  That's how I learned!  Finally I used OPI Mermaids Tears, again with my tiniest dotting tool, for the leaves. Make small triangle shapes off to the sides of the flowers where ever it looks like they are needed or where space needs to be filled.  Top with a nail-art friendly top coat, like Seche Vite, and you're done!  


Here's one more final photo taken with flash.  You can really see the holo in the rose petals this way!


I hope you guys enjoyed this weeks design!  I loved wearing it!  I'm so busy lately I only make time to do any nail art anymore just for ya'll, so it's especially fun when I get to it! Until next month...   

Tiffany, those are gorgeous!!!! (I think we can all agree on that!) Now it's YOUR turn to link up your pretty nails! As always, I will pin some of my favorites!

Wednesday, April 30, 2014

Free Printable - It's not about ideas, it's about making it happen

Our fantastic printables contributor, Sarah has done it one again. And with this one I swear it was like she was reading my mind.

Sarah's created the awesome saying "It's not about ideas, it's about making them happen" as a desktop image, an iPhone background as a print you can hang up on your wall. Pretty fabulous, right? Make sure to bookmark Sarah's BLOG, and enjoy these beauties!


For your desktop:

For your iPhone:

For your wall (print as an 8 x 10)

Monday, April 21, 2014

Mani Monday with Tiffany

Happy Easter to all the Glitter and Gloss readers!  Hope ya'll had a fantastic Sunday with your loved ones.

I'm going to be up front about today's mani.  I wasn't loving it.  I wore it for maybe 24 hours and took it off.    My plan A was a bust.  So this was plan B.  My stamping skills have clearly digressed since I have had no practice in a while.  However, I did get a few compliments so maybe one or two of you will like it too!


For this mani you will need a white base polish, five color polishes of your choice, plastic wrap, black stamping polish and all the other usual suspects (like acetone, cleanup brush, etc.)


As I did not get nearly enough pictures for a good tutorial, there is going to be a lot of explanation.  I apologize.  I forget to take pics!  Before you start, cut up the plastic wrap into strips or squares, just big enough to ball up and cover one nail.  Do 10 (duh).

1. Paint a base coat of your choice on your nails.  I used Nail Envy Matte.
2. Paint 1 or 2 coats (depending on coverage) of your favorite white polish.  You don't need the white base to be perfect since you will be mostly covering it up.  I used 2 coats of my favorite, OPI My Boyfriend Scales Walls.
3. Here you have a couple of choices, wait a while for the base to be completely dry and continue with step 4, or use a fast-dry top coat (I used Seche Vite) to speed up drying time and continue with step 4.
4.This is where I should've gotten more pictures  You will want to do this part one nail at a time.  Choose one of your color polishes and paint one coat over the nail.
5. Immediately after, while the polish is still wet, take a piece of the balled up plastic wrap and press it on the nail and lift it off.  The plastic wrap will lift off some of the wet polish.  I generally just have to press it to the nail one time, but if it leaves too much polish you could dab it one more time with the plastic wrap.
6. Repeat step 5 on the other 9 nails, using a different color polish for each nail.  (I used the same 5 colors for left hand and right hand).
7. Use a fast-dry top coat to smooth out the surface and dry fast for stamping.
8. Use your black stamping polish and BM315 to stamp the image on all nails.  Try to get it horizontal - I clearly failed at that.  I think I got 1 nail (on the other hand) horizontal.
9. Use a fast-dry top coat AGAIN to seal the design and ...dry fast.  And you're done!

It sounds a little complicated it but it's not so much.  Especially if you don't do the final stamping step.  I really do love a plastic wrap mani but something about the colors in this one didn't exactly appeal to me during wear.  You could use any combination of base colors and top colors.  The top colors that I used are from thumb to pinky: Zoya Shelby (not pictured), Essie Playdate, Sally Hansen Complete Salon Manicure Buttercup, Color Club Evolution, Butter London Trout Pout.   

See you next month!

LOVE these, Tiffany!!

So, what are YOU guys rocking on your nails? Link up below, and I'll pin my favorites!


Wednesday, March 12, 2014

March to your own beat free printable

Happy Wednesday, everyone! Today our printables contributor, SARAH has an awesome free printable
that I am in love with!


She was also awesome enough to create it as an iPad and iPhone background, what what!

I love them all and know you will too! If you haven't yet, make sure you check out Sarah's blog HERE and be sure to follow her on Pinterest HERE!


For you to print:

For your iPad:

For your iPhone:

Wednesday, February 12, 2014

She who leaves a trail of glittter....a FREE Printable

Happy hump day, everyone! Today I am so excited to introduce Sarah of Venus Trapped in Mars as the printables contributor for Glitter and Gloss!! Every month she will be sharing an 8 x 10 printable, and a version for your iphone too. 

From Sarah:

"I like to think of myself as one of the boys and FAB!  Think of me as the ESPN for women, just wrapped in a sparkly package with tons of glitter and fabulocity! Ever heard of the phrase, “Fall in love with as many things as possible?” Well, that is the definition of me! Not only do I live and breathe sports, but I love graphic design, adore fashion and shopping, and my addiction for Bravo is kind of embarrassing. Oh, and laughing is my cardio, so be sure to come to my blog ready to workout!" 
Pretty sweet, right? I am a huge fan of this month's printable - I've even made it my Facebook header! I hope you love them too, and be sure to check out Sarah's fabulous blog!!

Download the 8 x 10 HERE

Download it for your iPhone HERE


**Note** Remember that with the iPhone5, your wallpaper will get distorted if you don't have "reduce motion" turned on.

To turn "reduce motion" on:
Settings ---> General ---> Accessibility ---> Scroll down and click "Reduce Motion"---> turn that ON


Monday, February 10, 2014

Mani Monday


Hey ya'll!  I'm back for my second Mani Monday contribution to Glitter and Gloss!  Since this is February, the love month, I figured a Valentines themed design was appropriate.  This is the final look:


The polishes I used for this design are OPI My Boyfriend Scales Walls (white), Zoya Sweet (light pink), Milani Fast Fuchsia (dark pink), a-England Camelot (black) and Excalibur (silver).  The tools I needed to do this design are my dotting tools and a wedge shaped makeup sponge.  I got my dotting tools at Amazon.com - these are the ones I use, it's a set of 5 double-ended ones.  I've had them for a year and a half so far - they're still in great shape:

These are something like the makeup sponges I used:


1. I painted my nails with 2 coats of My Boyfriend Scales Walls and 1 coat of Fast Fuchsia on the accent nail.  
2. I used My Boyfriend Scales Walls and Sweet to do a gradient on all nails except the accent nail.  I learned how to do my gradients from The Nailasaurus.  Click here for her tutorial: The Nailasaurus Gradient Tutorial. It's really the best way to get a smooth gradient in my opinion.  She uses a slightly different sponge than I do. I had to do about 2 layers to get this gradient.

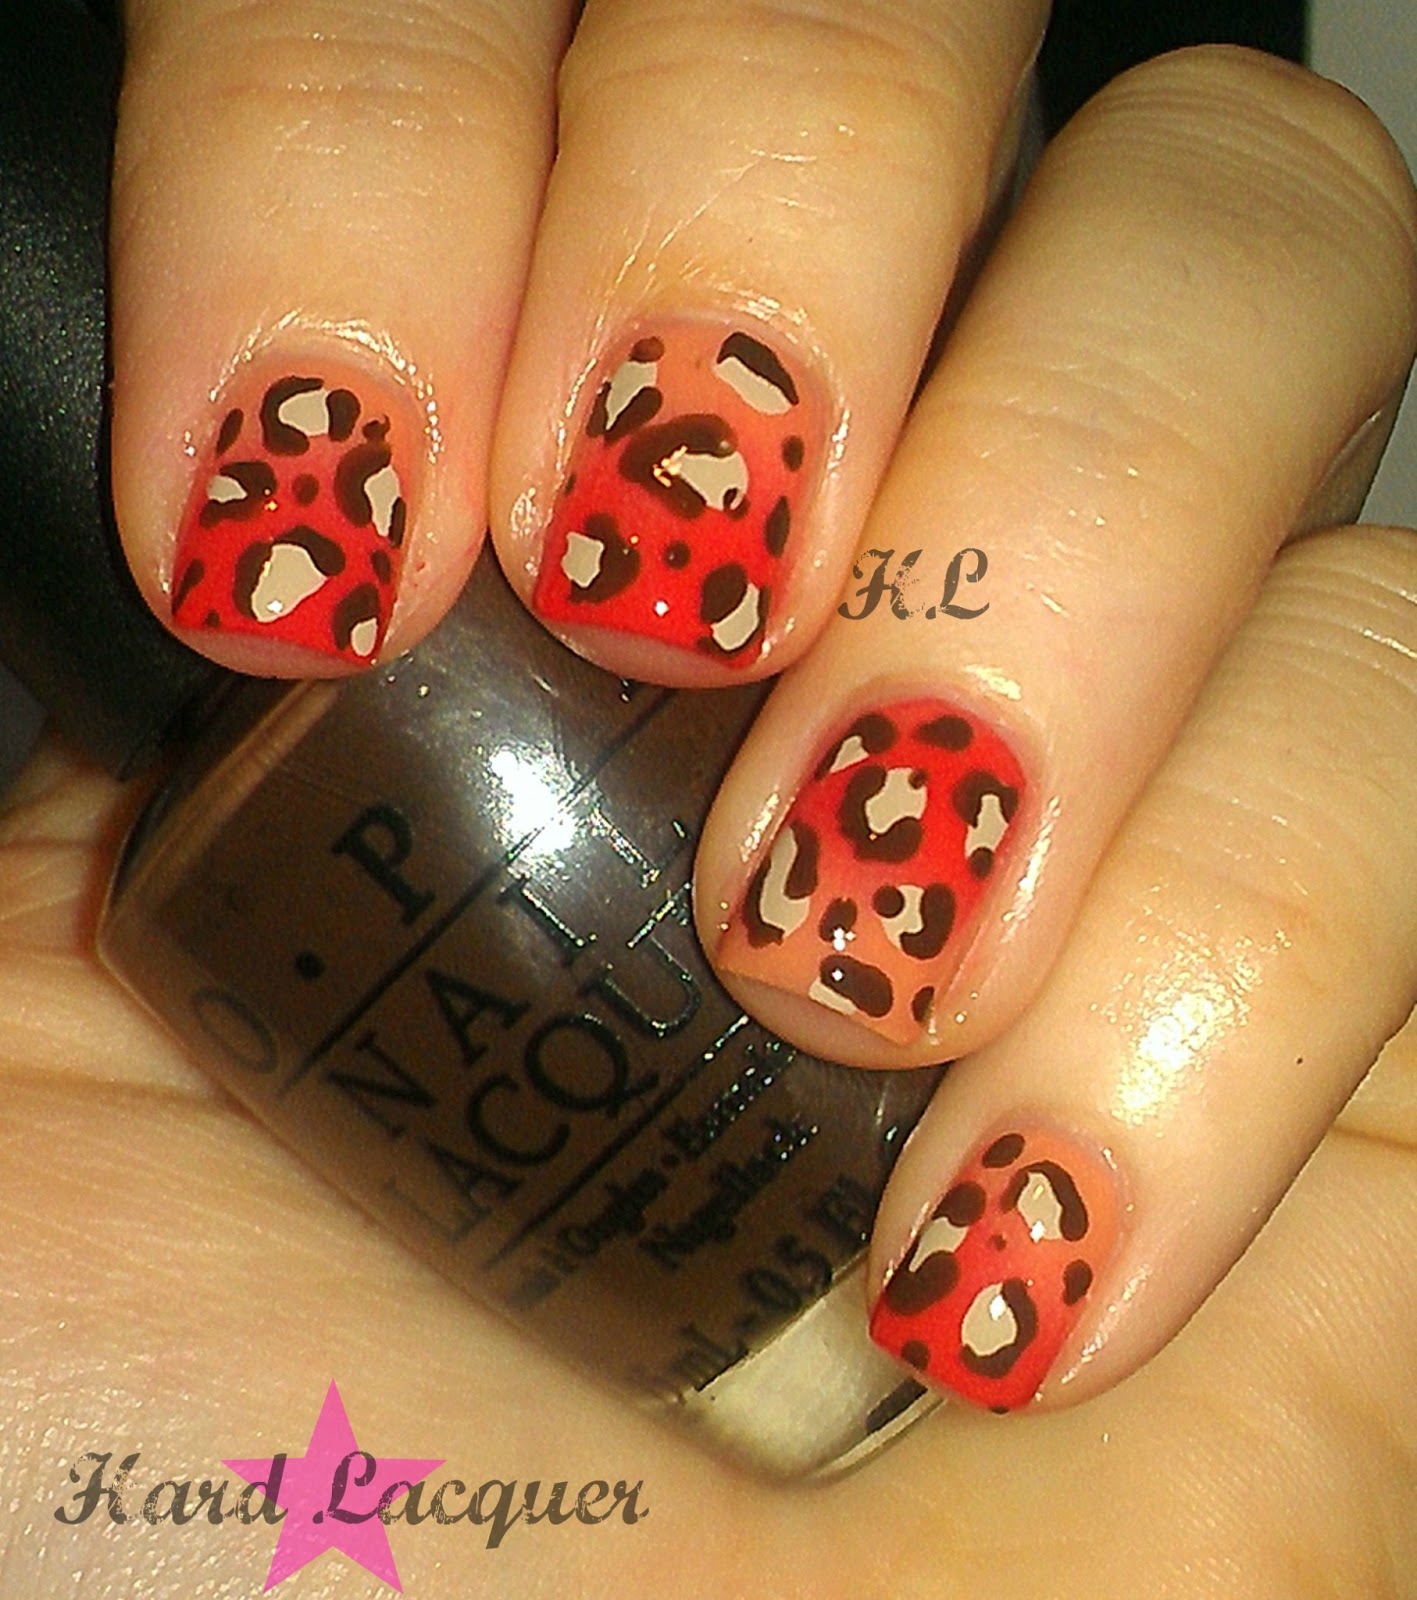
3. I used my dotting tools to put on the leopard spots, some of which are heart shaped.  I used Fast Fuchsia for the spots on the main nails and Excalibur for the spots on the accent nail.  These are very easy to do because it does not have to be perfect, in fact it's better if it isn't.  For the hearts I used a larger dotting tool and used two dots side by side for the top part, then used a very small tool to draw lines down to the point and fill it in with polish.  I should've gotten pics of these steps, so I hope what I explained makes sense!  To use dotting tools - drip a few drops of polish on a sheet of paper and dip the tool into it.  There is much more control this way than dipping straight into the bottle.  Trust me - don't dip straight into the bottle!

4. I used a small dotting tool dipped into Camelot and outlined the spots and filled in the bare areas with small dots.  You don't want to completely outline the spots, but make irregular C shapes around them.  Then of course I did my clean up and put a top coat to smooth out the surface and seal it all in.

As you can see I didn't do any cleanup until the very last step.  If it helps you though, you could certainly clean up after each step.  Also, if you don't like the hearts, just leave them out and make regular spots!  I used these specific colors, and the hearts, to go with the Valentines theme, but the color possibilities are endless here.  You could also leave out the gradients on all the nails like I did for the accent nail.  Here are some examples of leopard mani's I've done in the past.  Definitely get better over time:


Hope you guys enjoyed!  I'd like to see if you try them!  See ya'll in March.  Happy Valentines Day!


You can find Tiffany here: BLOG  *  INSTAGRAM

These are awesome, Tiffany!! Now it's YOUR turn to link up!! I can't wait to what you guys are rocking, and I'll pin my favorites!  xo, Heather


Monday, January 13, 2014

Mani Monday - WELCOME to our new MM contributor!

You guys, I am so excited to introduce you all to Mani Monday's new contributor, Tiffany. Tiffany is a bit of a nail art pro, and once a month she will be sharing some of her great nail looks and techniques with us.  Take is away, Tiffany!

Happy Mani Monday to ya'll!  I'm Tiffany.  Heather has kindly and awesomely asked me to take over one Mani Monday a month on her blog!  I'm flattered and honored to be here!

A little about myself first:  I'm 29 years old and I have 2 awesome little girls, Danica who is 4 and Emersen (Emmy) who is 3.  They're 18 months apart and you can usually find me breaking up their fights or pulling them down from the chandeliers.  (Okay, I don't really have any chandeliers but if I did I'm sure they'd be swinging from them.)  I've been into painting my nails since middle school.  In high school and college I did the tips and acrylic thing but once my kids were born I kicked that habit and began stalking various nail blogs.  I became a total addict.  I haven't inventoried my stash in a while but I believe I have close to 300 bottles of polish!  My own nail blog was born a little over a year ago but hasn't seen a new post since May 2013!  If you'd like to check it out anyway, it's here: Hard Lacquer.  I'm much more active on Instagram (@hardlacquer).

Enough about me - onto the nails!  I decided to do a water marble for ya'll.  I have to admit - I had a hard time finding polishes that would work well this time!  I don't know what the deal was, but I ended up with a neon combo (that I've used before) and a black/white combo.
        

The colors I used on index and pinky are Wet 'n Wild Black Creme and Wet 'n Wild French White Creme.  The middle and ring finger were marbled with China Glaze Love is a Beach (pink), Splish Splash (blue) and Sun-kissed (yellow).  Please excuse my middle finger, I got a hair stuck on it... 

There are hundreds of great watermarble tutorials out there, most of which I have watched or read to hone my technique - but I'm gonna give a quick rundown of the steps and tips I've found helpful so far.  It really does take lots and lots of practice and even after you get good, you'll still have days where they don't turn out so great.

Here's what you'll need:
- White or Nude base polish
- Acetone and Brush or Qtips for clean up
- Tape
- 2 or 3 color polishes of your choice
- Orange stick or other pointy object for dragging the polish in the water (I use my most pointy dotting tool)
- tooth picks (or orange stick dedicated specifically to watermarbling)  
- small cup of room temperature filtered water 
- tweezers


Before you start, open all the polishes you will be using - you don't want to do this with a wet base coat.  Fill up your cup with room temperature filtered water.  You can use a small plastic or paper cup (easy clean up here) or a small glass cup (cleans well with acetone and you'll always have it).  I personally use a shot glass.  Then:

1. Paint a base coat on your nails - I usually use white, regardless of what actual colors I'm putting on my nails.  A light nude color would also work well.  Occasionally I will use the lightest color of the polishes I'm marbling with - it just depends on the combo.  This time I used 1 coat of Milani White on the Spot. There is no need for this to be perfect or completely opaque, we just need a blank canvas for the color to show up on, since the layer of polish in the water will be very thin. 

2. Tape around the nail bed.  Watermarbling is messy and this really helps with the clean up.  Some people use vaseline or chapstick around the nail bed - but taping works best for me.     

3. Drip the polish into the water, one or two drops at a time, in a bulls-eye fashion.  For the image above I did 1 drop Sun-kissed, followed by 1 drop Love is a Beach, followed by 1 drop Splish Splash, then the same cycle once more. 6 rings.

4. Take your orange stick (or pointy dotting tool, or toothpick, etc) and lightly drag it across the surface of the water to make a design.  You'll get better at this the more you practice.  There are many possibilities here.  I tend to stick to the design above.   


5. I should've gotten an "action shot", but I didn't and for that I apologize.  What you want to do next is get your nail pretty close to parallel with the surface of the water, and lay your nail into the design.  Once your finger is completely "dunked" you can move it however you need to in the water.  LEAVE YOUR FINGER IN THE WATER while you take a toothpick or orange stick and move it around in the water to clean up the excess polish.  It should stick to the toothpick pretty easily by this point.  If it's not picking it up, let it dry a little longer.  Cleaning all the polish up out of the water before you pull your finger out is VERY important. This pic is right after I've removed my finger from the water.

6. While the polish is still wet, pull off the tape.  I use tweezers to do this.

After you pull the tape off, use a brush dipped in acetone to clean up the excess polish and get the clean line near the cuticle.  Add a top coat.  For these I used 1 coat of INM Out the Door Northern Lights for sparkle and then my usual Seche Vite.  And you're done!  


Some extra tips:
- Not all polish will work well.  The more you do it the more you will figure out what works and what doesn't, but largely this will be trial and error.  I tried a bunch of white and blacks before I landed on two that were satisfactory for this design and I still wasn't completely happy.  Sometimes it helps to use polishes of the same brand together.  Sometimes a certain polish will play well with some polishes but not with others, so just because it doesn't work one time you try it, doesn't mean it won't work with something else.  Most of the time, neons DO NOT work - they dry way way too fast in the water, almost as soon as you drop it in.  You can not draw a design if the polish is already dry on the surface.  If you really want to marble with neons, I suggest the China Glaze Summer Neons collection from 2012. That's where these 3 came from.
- I learned this from My Simple Little Pleasures: when doing your design in the water, always drag a line from the center of the innermost circle to the edge of the cup on two opposite sides first thing.  This anchors the polish to the sides of the cup, stabilizing the polish and makes it easier to draw your design. Go watch her videos because she's awesome, she has a ton, and you can learn a lot from her!
- You want to work somewhat quickly since you can't draw a design in dry polish - but this time will vary each time depending on the nature of the polish you're using.
- Keep some paper towels near by to wipe off your drawing stick after every stroke or two in the water.  You don't want polish build-up on your tool - it will mess up your design.
- Once you've cleaned up the water and removed your finger, there may be random bits of polish floating on the surface of the water.  If that's the case, drop one drop of polish in the water, make sure it spreads to all sides, then let it dry.  Once dry, gather it all up with a tooth pick or other tool and voila! The surface of your water is clean.

Thank ya'll for reading!  Sorry if it got too lengthy, but I hope I covered everything...feel free to ask questions! Thanks so much Heather for inviting me to do this!
/ / /
These are AWESOME!! Thanks so much for sharing, Tiffany! Now it's your turn to link up!! Can't wait to see what you guys have been rocking on your nails!


design + development by kelly christine studio